8.08.2011

Baby Makeover.

I'm obsessed with home interiors. There. I said it. So when my cousin Erica, who is expecting her first child (a girl), asked for a little input with her nursery I squealed in delight (ok, maybe not. but i was squealing on the inside).

I should've taken pics of the already-adorable room. Butttttt I didn't. It is painted in a warm gray tone, there is terrific natural light, neutral carpet (hardwoods underneath), nice big closet, and a pretty view of the backyard! What's not to love?

She was thinking of keeping the walls their current color - which I whole heartedly support. Painting = thumbs down. Walls that are pretty and already painted = thumbs up. She also has some vintage green suitcases that she wanted to incorporate....hmm.

So here is a little rendering I did to get her wheels-a-spinning. Now, when I do room "plans" - I use that word loosely. They aren't really meant to represent every little thing to the very last detail...it is just to create a feeling and to sorta visualize how certain things look together. Faux bear rug not your thing? That's completely fine, a nice tone on tone ivory stripe would also work just lovely. Hate that yellow lamp? Substitute it with a cute garage sale find. No worries.

So there you have it. My Mini-virtual baby nursey makeover! I'd love to stay and chat some more, but I've got a serious date with my dvr.

Have a great night!
Casey


7.28.2011

Best "Healthy" Cookies...

These are the MOST delicious "Healthy" cookies you will ever have. Ever. My sweet coworker Kelly baked me a batch as a form of payment for one of my baby posters. I knew I just had to share the recipe.


The Ultimate Healthy Chocolate Chip Cookies


Ingredients
Wet
  • 3/4 cup unsweetened apple sauce
  • 1/2 stick butter (we use salted butter)
  • 3/4 cup raw honey (pick up at your local health food store, substitute regular honey if that is all you have)
  • 2 tsp. pure vanilla extract (I advise against using imitation vanilla)
  • 1 egg
  • 1 egg white
Dry
  • 1 1/2 cups whole wheat flour
  • 1 cup whole grain rolled oats (I do not use quick oats, so I roughly chop these oats in my food processors before adding to other ingredients)
  • 1/4 tsp. ground nutmeg
  • 1/4 tsp. cinnamon
  • 1 tsp. baking soda
  • 1 tsp. fine sea salt
Finishing touches
  • 12 oz. package of Ghirardelli 60% Cacao Bittersweet Chocolate Chips
  • 1/2 cup chopped walnuts
  • 1/2 cup chopped craisins (a.k.a. dried cranberries)
Preheat oven to 350 degrees.  Now just mix and bake them like a batch of normal chocolate chip cookies.  In a mixing bowl, combine all the wet ingredients (I partiallysoften the butter in the microwave, just be careful not to melt it too much).  Stir them together with a spoon.  In a separate bowl, combine the dry ingredients.  Now carefully stir in the dry ingredients in with the wet.  Now stir in the finishing touches.
Place cookies on baking sheet and bake at 350 for 10 – 14 minutes, depending on your oven and how well done you like your cookies.  Enjoy fresh out of the oven, or frozen then warmed in the microwave for 20 seconds.
Alternate/additional finishing touches (add whatever you have a taste for here and substitute it for the finishing touches above, here are some ideas for additional )
  • 2 mashed banana (If you use banana’s only use 1/2 cup of applesauce)
  • 1 cup shredded & toasted coconut
  • 1 cup Rice Krispies
  • 1/2 cup chopped raisins
**Remember…these cookies freeze well, can be eaten as a breakfast meal and are a great healthy treat for any time of day. Here is the link to the site where she got the recipe.

7.19.2011

Baby Mania Posters!

Baby Mania POSTERS! Nursery Wall Art!

ATTENTION: ALL NEW MOMS, OLD MOMS, MOMS, DADS, SISTERS, FRIENDS...EVERYONE.

As some of you know, I make these baby posters as a little hobby. I've gotten SOOO many requests to make these for my friends at work, friends of friends, etc. After some pressure from a few people, I thought I would offer these little gems to the masses....So here is the rundown:

Cost: $30...if I have to ship it, that will be a little extra.
Size: They fit perfectly in an 11x14 frame.

These are COMPLETELY custom - any variety of colors & phrases. The perfect wall art for any nursery, bedroom, playroom - anywhere!

If you are interested email me at caseyjodi@gmail.com (PUT BABY POSTER IN THE SUBJECT LINE) - send me your list of facts/phrases and color scheme. If you'd like, for colors you can send me links to your fav bedding at target, a pic of your nursery, etc.

Popular Fact Ideas:
First Name
Middle Name
Last Name
Birthday
Time of Birth
Weight
Length
Eye Color
Hair Color

Popular Phrase Ideas:
The Sun Was Shining
Daddy's Grin
Gift from God
Little Princess
John & Sue Proud Parents


**I do not own these nursery pics. Couldn't find the source.

6.20.2011

Grilled Flat Bread

A few weekends ago, Vincent and I went to Fire By the Monon in Broad Ripple for dinner. We've only been there twice, but this place definitely is on our list. Fresh, locally-sourced, delicious food, with a Broad Ripple location we love - can't be beat. They were featuring one of their flatbreads as an appetizer during the Chowdown Midtown event. We both thought it was delicious...we got the Blue Blaze, in case you were wondering.  YUMMMM!  So immediately I began to ponder how I was going to recreate this sort of dish at home. So here is what I did...

  1. I sliced and diced some of my favorite veggies (onions, zucchini, mushrooms, garlic) and sauteed them in a little olive oil. I like my veggies to maintain their texture...no mush, slightly tender and gorgeous.
  2. I added 5-10 large salad shrimp (not raw) to my veggie mixture, and heated through.
  3. I brushed olive oil on top of a wheat pita. 
  4. I sliced a 'mater and covered my pita & added some fresh cracked black pepper.
  5. I spooned all of this goodness on top of my 'maters and put it on my preheated (medium heat) grill.
  6. Let it "cook" for about 10 minutes, keep your eye on the bottom to make sure it doesn't get too toasty.
** Any sort of cheese would be an AMAZING addition to this dish if you are feeling a little indulgent. We are anxious to try several variations of this meal!  Healthy, beautiful, delicious....now that's dinner!


Enjoy!

Casey

6.02.2011

Let me see your grill...

The day warm weather arrived...so did my desire to grill. Vince and I recently purchased this beauty to replace our George Foreman standup grill we bought about 4 years ago. Due to the fire codes in our building, we are not allowed to have grills with open flames - thus resulting in our need to go electric. Eh. Electric, schmelectric.

Sure, it isn't the grill of our dreams, but we are really enjoying putting it to good use...and making some PRETTY PRETTY delicious and healthy meals.

Here is one of our favs....GRILLED VEGGIES!
  1. Take a piece of foil and fold in all four sides about 1/2 inch - making a flimsy tray. The folding of the sides will help keep all of your goodies safe.
  2. Cut up LOTS of delicious veggies of your choice! We like, peppers, zucchini, onion, mushrooms, garlic, tomatoes, asparagus...yum!  I can smell it now!
  3. Add all of your veggies to your tray...I like to put the veggies that need to cook the longest on the bottom - I usually start with peppers & onions, top with mushrooms & tomatoes....all the others somewhere in between.
  4. Lightly drizzle with some EVOO, (extra virgin olive oil for all you non-Rachael Ray fans) and some fresh cracked black pepper.
  5. Throw that baby on your preheated grill (medium heat)...and you are cooking!
  6. Let veggies cook until desired tenderness is achieved...I like mine to retain a bit of texture - don't want a bowl of mush.

**DISASTER PREVENTION** When transporting your foil tray to your grill...it is probably a good idea to keep something solid underneath. I usually use a cutting board.

What do you like cooking in the warm summer months?
So fresh, so pretty!


Happy Grilling.
Casey


5.24.2011

A-DOR-A-BLE!

if this doesn't make you smile, i don't know what will.

Paddington, just being cute. As usual.

4.26.2011

Casey Wiscons: Bird Whisperer

I tried to save bird last weekend.  It's a long story...watch the video.


Casey

4.18.2011

I'm the muffin man...errr woman.

Servings: 18
Prep Time: 10 minutes Total Time: 25 mins
Ingredients:
1/2 cup butter, softened
1 cup granulated sugar
2 large eggs
2 large ripe bananas, mashed
2 cups all-purpose flour
1 teaspoon salt
1 teaspoon baking powder
1/2 teaspoon baking soda
1 cup buttermilk
1/2 cup chopped pecans
1 teaspoon vanilla extract

Directions:
1. Preheat oven to 375°F Grease 18 standard muffin pan cups (or use paper liners. 2. Beat butter and sugar together at medium speed until light and fluffy. 3. Add eggs one at a time, beating well after each addition. 4. Beat in bananans until smooth. 5. Mix together flour, salt, baking powder and baking soda. 6. Alternately stir flour mixture and buttermilk into egg mixture until dry ingredients are just moistened. 7. Stir in pecans and vanilla. 8. Do not overmix batter; it should not be completely smooth. 9. Spoon batter into prepared pan, filling two-thirds full. 10. Bake until lightly golden, 15 to 18 minutes. 11. Transfer to a wire rack to cool slightly. 12. Serve warm.

4.04.2011

Mmm...Balls.

I've made these a few times. Love them. Easy. A little time consuming, but worth it. So fun to mix & match flavors.  What's your favorite?


Ingredients

  • 1 box cake mix
  • 1 container prepared frosting
  • 1 package candy coating

Directions

  1. Prepare the cake mix according to package directions using any of the recommended pan sizes. When cake is done, crumble while warm into a large bowl, and stir in the frosting until well blended.
  2. Melt chocolate coating in a glass bowl in the microwave, or in a metal bowl over a pan of simmering water, stirring occasionally until smooth.
  3. Use a melon baller or small scoop to form balls of the chocolate cake mixture. Freeze for at least an hour. Dip the balls in chocolate using a toothpick or fork to hold them. Place on waxed paper to set.

* I have heard you can use melted chocolate chips + a little vegetable oil in lieu of the candy coating.  Haven't tried that yet, so if it doesn't work out...don't blame me. 


Eat 'em up!

Casey

3.19.2011

Things to be happy about today...

1. Sunshine
2. Crisp cool air
3. Planting seeds (more on that later)
4. Discovering a voicemail from my bff - that was left at 3:15am. :)
5. Bar Keeper's Friend, a must-have in your cleaning supply army.
6. Spying the father-son time across the street. Today's lesson is power drills.
7. The sound of the city: car horns, dogs barking, traffic rushing by, police sirens, pedestrian chatter, church bells (it's noon). Love it all.


It's a good day. What's you source of joy today?


Casey

3.16.2011

Courtesy of my black-Irish roots...


Here's to you and yours. And to mine and ours. And if mine and ours ever come across to you and yours, I hope you and yours will do as much for mine and ours as mine and ours have done for you and yours!

- Irish Toast


Happy St. Patrick's Day!

3.15.2011

Bathroom Update, part II

Here she is! The afters. So here is what we did.

We painted. Out with the goldenrod an in with soft gray. The color is Ash from Restoration Hardware in semi-gloss. The color is a lot more neutral and more fitting with the current fixed elements as I discussed here. Because the color is so light I decided to paint both the walls and ceiling. Our ceiling was previously painted with cheap paint not meant for high-moisture areas = peeling, chipping paint...not pretty. I also painted inside the molding on the back of the white door for a little tone-on-tone action. No one will probably notice but me, but iLove. In summary, I love the color and vie learned bright, bold color doesn't necessarily mean BIGGER impact. I don't think a room should scream at you when you enter...and definitely not a bathroom.

We added storage. We removed our chrome bathroom rack and added a pair of floating shelves. The rack was beginning to rust due to the high moisture and I couldn't find another bathroom shelf that would suit my needs. The shelves I chose are the same wood tone as the vanity cabinet so they blend seamlessly into the space. I use the shelves to store a few extra towels and wash clothes, our Sony Air unit, and a basket for closed storage - toothbrushes, toothpaste, tweezers, etc. I purchased a coordinating basket for the top of the toilet for extra TP. Even though I "lost" a lot of storage by removing the medicine cabinet and metal rack, I actually feel I gained much more usable storage. All within an arm's reach.

We got a bigger mirror. If you read my previous bathroom post, you are already familiar with my strong distaste for our previous medicine cabinet. We got rid of it! We opted for a larger mirror to fill the space that was wasted. We chose a rectangle mirror with a travertine surround. The color of the stone ties in beautifully with the counter top & floors. We found this beauty at Lowe's on a total whim. I spent weeks searching for the perfect mirror to fit in the somewhat odd shaped void...I was hoping I wouldn't need a custom mirror made, luckily this one worked out - straight from the box!

The whole process took several weeks of planning, purchasing, and researching what I wanted to do. We were able to complete the labor in a weekend, and I created the artwork a few days later. We are very happy with the update and love that our tiny bathroom is now much BIGGER in style.


Casey

3.13.2011

On the to-do list today...

1. Brunch with my lady friends
2. Update blog, bathroom update part II
3. Clean house
4. Laundry
5. Find a little time to relax


Ok...go! What is your Sunday looking like?


Casey

3.03.2011

I know what I am...

Here's a quick little visual quiz to help steer your decorating sense in the right direction!  There's no wrong answers!  WOOHOO!  I LOVE being right!


60% Rustic Revival
40% Cottage Chic


Rustic Revival
You can take kid out of the country but you can't take the country out of the kid... or is your theme "you can take the kid out of the city, but you can't take the city out of the kid?" Either way you play it, you are one of the unique individuals who loves a mix of modern and country. The clean lines of the modern softened by rustic /vintage elements is the perfect mix in your mind. And can we blame you? You've taken the best aspects of two popular designs and mixed them in a manner that appeals young and old alike. A subtle background of white or light colors provides a nice canvas for all the wonderful flea market, eBay or garage sale finds as well as the classic modern pieces that you love.
from sproost.com

Materials

The material palette for urban country runs the gamut because of the two extremes being mixed. On the countryside you see a lot of wood, woven rope, canvas and linen, rustic metals and wrought iron, cowhide and vintage leather. On the more modern side, you see acrylic, satin and polished nickel and chrome, glass, faux fur, refined leather, fiberglass and sleek woods. It's the mixing of these elements that makes the style work so well. Seagrass and other natural woven materials are often used for floor coverings. Concrete and natural wood floors are very popular, and work really well together.

Colors

When it comes to color, think light, casual and airy. White, pale gray or beige, khaki and sage; all of these colors make nice, subtle backdrops for Urban Country style. Think of the colors of natural linen, concrete, and if you'd like to go dark, use the dark brownish-black of iron or the deep burnt orange of rust. The key is to keep the spaces feeling open (go modern!) and yet warm (yay for rustic!), and by going light on the walls and major pieces and more color on the accents and accessories you can achieve this mix really well.


Cottage Chic
Who says that cottages can't be modern and chic? Who says that they have to be floral and cheesy? Not you! You love the carefree spirit that the cottage interior inspires, but you are also serious about your appreciation for modern art and hip treasures. You love old and new alike, and love to highlight them all to expose the uniqueness of each. What better way to show off these treasures than with a light background?
from sproost.com

Materials

You have a great sense of humor when it comes to design and even like to make fun of the style itself. Which means that you will throw in a toy boat or a vintage life preserver to keep the mood of the place just like the color: light! The fabrics are natural (cottons and linens) and are light in touch. Much of the furniture is wood or wood framed (the lighter the better, think driftwood!) and as long as it's used sparingly or with modern lines, you even throw in a wicker piece here and there.

Colors

Your true inspiration (whether you know it or not) is the sea... the colors found at your favorite beach: white and light beige of the sand, a variety of blues for the ocean and sky, and greens and pale grays of the sea glass... but the key is white! Your space should feel light and airy and give off the mood one has when at the beach: laid back! The key with Cottage Chic is balance; in one corner there could be a rustic wood table that looks like it could have been found rather than made, but it is offset with a modern vase while another corner is adorned with a modern Lucite piece.

Space Planning

The furniture is comfortable and the layout is cozy. The more it encourages intimate gatherings the better! Just watch out for the red wine spills on the new white sofa! The color throughout is light and airy - and though you love to accessorize with fun colors (the sky's the limit with a white background), the main color seen and felt throughout the house is white or very light versions of colors so that they feel almost white.


...but what are you?


casey

photos & link from - http://www.sproost.com/

3.01.2011

Bathroom Update

"Fun Sized" Bathroom
 The past several months, Vince and I have diligently been tackling several projects around the house. Perhaps that is why my blog has been neglected all these months.  :) Our bathroom has been an area that I have wanted to improve for quite some time. Let's talk about the issues.

1. Size.  Yes, size does matter.  Especially in a bathroom...our only bathroom. Vince and I have the same work schedule, so we must plan our mornings so that both of us have ample showering, teeth brushing, & grooming time. It is not uncommon for us to double up in the bathroom in order to make this arrangement work - Vince showers while I brush my teeth; I shower while Vince stares into the mirror at his cute face...etc.

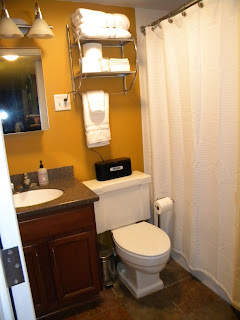
2. Storage. In my opinion, storage is the most important "element" in the bathroom...of course after all of the basics are covered - toilet, shower, sink, lighting, mirror - CHECK!  We've got those!  Storage, not so much. There unfortunately isn't a linen closet in our bathroom...so no place for extra towels, tp, toiletries, etc. There is not enough floor space for a free-standing piece of furniture to house anything we wish to hide. And we are also lacking counter space as well...so not a lot of wiggle room to place toothbrushes, hand soap, & decorative items without overcrowding.

U-G-L-Y medicine cabinet.
 3. Color. I have no one to blame but myself on this one.  It was my decision to paint our tiny, tiny bathroom bold, bright, loud goldenrod. I don't have a problem with the color itself...actually I love the color.  The problem is the space + the color. What I didn't consider when picking this color (almost 4 years ago) were the fixed elements...floor, vanity, counter, toilet, shower. Our dark ceramic floors are made to look like slate...so lots of natural tones. Our solid surface countertops have a similar color story as the floor....speckles of beige & tans are grounded by a dark gray background. And obviously our toilet is bright, porcelain white....which goes right along with our shower/tub which is also white porcelain.  Our vanity is a dark, rich mahogany color....all of these elements just do not mesh well with the yellow. Lesson learned: consider the color & tone of fixed elements, or furniture before choosing a paint color. Start your palette with the colors & tones of the pieces that will not change...ie: flooring, a sofa, custom drapes, etc.


The Positives.
The fixed elements in our bathroom are actually pretty nice...we don't have a seafoam tile shower or a pink sink or a flat mirror with the bulbs across the top...Because if we did, this would be a much larger project.  I'm pretty set on my white towels & shower curtain...no need to purchase new items for a new scheme. The space is small, but it is efficient...everything works...everything is clean...and the fixed elements aren't offensive to look at. 

Stay-tuned for the updated photos...I'm thrilled with the results!  

Casey


2.24.2011

Hello, delicious.

I stumbled upon this little gem, whilst surfing the vast and expansive abyss we like to call the 'net. My mouth immediately began leaking slobber, blog-worthy....CHECK!


Red Velvet Cheesecake Brownies

Borrowed from Hell Yeah, Recipes!
Brownie:
1/2 cup butter
2 oz dark chocolate, chop
1 cup sugar
2 large & in charge eggs
1 tsp vanilla extract
1 1/2 tsp red food coloring
2/3 cup flour
1/4 tsp salt
Cheesecake:
8 oz cream cheese, soft
1/3 cup sugar
1 large & in charge egg
1/2 tsp vanilla extract


Preheat oven to 350F. Butter the bottom and sides of a 8 inch metal baking pan. Put a long piece of parchment paper in the bottom of the pan, letting the parchment extend up two sides of the pan and overhang slightly on both ends. (This will make it easy to remove the bars from the pan after they have baked.) Butter the parchment. In a small, heatproof bowl, melt butter and chocolate together. Stir until combined and very smooth. Set aside to cool for a few minutes. In a large bowl, whisk together sugar, eggs, vanilla extract and red food coloring. Add chocolate mixture and stir until smooth. Add flour and salt and stir until just combined and no streaks of dry ingredients remain. Pour into prepared pan and spread into an even layer. To prepare cheesecake mixture, beat cream cheese, sugar, egg and vanilla extract in a medium bowl until smooth. Distribute the cheesecake mixture in 8 dollops over batter in the pan. Swirl in with a knife or spatula. Bake for 35-40 minutes, until brownies and cheesecake are set. A knife inserted into the cheesecake mixture should come out clean and the edges will be lightly browned. Let cool completely in pan on a cooling rack before lifting out the parchment paper to remove the brownies.
Borrowed from Hell Yeah, Recipes!

2.15.2011

Just love.

        This post comes just one day after my husband's 28th birthday, and the annual love-fest we call Valentine's Day.  There isn't a day that passes that I don't realize how incredibly lucky I am - but some days I am more aware than others.  Yesterday was one of those days.
        It's one of the most cliche statements a wife says about her betrothed - "He's my best friend." Cliche or not, sometimes there isn't a better way to make such a straightforward pronouncement. After a brief discussion we had last week after seeing some cheesy commercial - I'm guessing it involved a man & a woman some sparkly piece of jewelry, and ended with an awful jingle...every kiss begins with kay, he went to jared, etc.  You get the point.  Back to the story...
        I was telling Vince how much I appreciated him NEVER feeding me blatant lies, that us ladies tend to ooh and aah over.  Vince has never said..."You are the most beautiful woman in the world." "There is nowhere I'd rather be." "You complete me." Yada yada yada... I can see how that could sound like a bad thing.  But, from where I'm standing (sitting, currently) this is the best thing for a relationship.  A relationship that is not built on repeated quotes from movies, one liners, and insurmountable levels of perfection. 
The minute you stop saying things just to please people...that's when your heart truly speaks.
        This is all just from my personal perspective, of course - nothing scientific or even factual for that matter.  Just purely my thoughts. Being the cynic I am - I don't believe 2 people are "meant" to be together... I don't really think things happen for a reason... Fate. Destiny. Whateveryouwanttocallit. I don't buy it....so with that said,  I think eliminating the "fluff" is the only way to give & receive proper love.
        I love you Vince! I love that you love me (and the animals) like you do! I love that you let me be right, but tell me when I'm wrong. I love that you don't laugh at all of my jokes because they are not always funny. I love to hear you laugh. I love that you don't expect anymore of me than I do of myself. I love that we are going through life together.

casey


2.07.2011

Sometimes it's reassuring knowing I'm not the only one pretending to be normal.

I have a new obsession.  And his name is Dexter.  I know I'm late jumping on the Dexter bandwagon, but wow.  Vince and I watched the entire 2nd season on Saturday, and are officially hooked.  There are so many things I enjoy about this show, but for starters - the witty & clever writing.  I've found that so many shows these days, lack any sort of intelligent dialogue (this, coming from the girl who loves a Real Housewives marathon)...I think too often tv shows/movies have been dumbed down and are annoyingly too obvious.  I love that the show keeps my mind wondering, guessing, and anticipating the entire 56 minutes...and when it is over, I immediately feel the need to watch the next episode.  There is really no need to elaborate any further...the show can speak for itself.  So I urge you to hit up your local blockbuster (while they are still around), queue it up on Netflix, or borrow the DVDs from a friend.

Casey

1.26.2011

new beginnings...er, newest.

wow. i can't believe how badly i failed my first go around,  blogging that is.  i started this blog in attempt to capture my many thoughts that race in and out of my head every day. oh well, here i go again...trying.

be back soon-ish.  :)


casey